最近遇到一个场区测量项目,好多年没有遇到类似的项目了。
场区成果图完成以后,需要按照调查比例尺进行分幅,以前的项目的图幅数比较少,顶多几十幅,手工切分就可以了。一般是硬切分,就想CASS分幅一样的。
以下是CASS分幅:
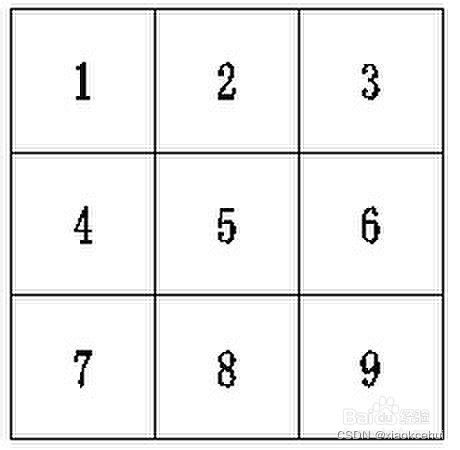
检查生成的矩形,把矩形内没有地形的矩形删除掉。然后把矩形内坐标更改为图幅名,如果图幅内有地名的话,可以使用地名作为图幅名。也可以以数字来做为图幅名,以数字做为图幅名应该把按顺序先标第一横排,接着第二横排这样标。

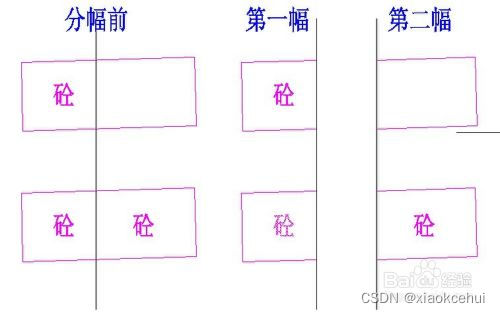
标注好图幅名,地形需要调整地形图中某些位置。比如下图中的砼房,分幅前的砼房,分幅线经过房中央把房屋分面两份,分幅后房屋就分别分布在两张图内,而房屋标注只会在一张图内出现,这会影响地形图的使用。所以分幅前应该照下图中第二幅房屋一样标注。同样其它地物需要标注的也应该作相应的调整。
但是,现在我们喜欢用视口分幅,这样的好处是:成果大图的任何更新不影响分幅图,一次分幅永久可用。另外,一个重要的原因是:分幅主要用来打印归档,设计单位还是喜欢用一张大图。
有些单位不用CASS,就自己编程实现批量分幅。博主也不喜欢用CASS,所以只能自己实现批量分幅功能。以前的作图程序已经实现了批量分幅,但是粗糙了点,分幅索引图(或者叫接图表)是手工实现的。
本次项目比例尺比较大,图幅数大于1000,用手工实现有点浪费人力了。
两年时间没有碰过了CAD VBA,又重新检了起来,有点打怵,不过查了几次帮助手册-AutoCAD ActiveX and VBA Reference,还有必应搜索了一个CAD VBA的好网站,见下图
功能很快也实现了,代码如下:
'在索引分幅图中画出测区边界和接图表
'
Private Function DrawMapIndex(ByRef objPaperSpace As AcadPaperSpace, ByRef vBJPts() As Double, nBJPt As Long, ByRef vMapPts() As Double, nMaps As Long, nMap As Long)
Dim plineObj As AcadPolyline
Dim points() As Double, points1(0 To 11) As Double
'Dim nSeg As Long
Dim dMinX As Double, dMinY As Double, dMaxX As Double, dMaxY As Double
Dim dxmin1 As Double, dymin1 As Double, dxmax1 As Double, dymax1 As Double
Dim i As Long
Dim sVert As Double, sHori As Double, sScale As Double
Dim dSVert As Double, dSHori As Double
Dim dSVMin As Double, dSHMin As Double
'求取边界四至坐标
dMinX = vBJPts(0)
dMinY = vBJPts(1)
dMaxX = vBJPts(0)
dMaxY = vBJPts(1)
For i = 1 To nBJPt
If vBJPts(2 * (i - 1)) > dMaxX Then
dMaxX = vBJPts(2 * (i - 1))
End If
If vBJPts(2 * (i - 1) + 1) > dMaxY Then
dMaxY = vBJPts(2 * (i - 1) + 1)
End If
If vBJPts(2 * (i - 1)) < dMinX Then
dMinX = vBJPts(2 * (i - 1))
End If
If vBJPts(2 * (i - 1) + 1) < dMinY Then
dMinY = vBJPts(2 * (i - 1) + 1)
End If
Next
'计算纵横比例尺,留出5mm的空余
sVert = (dMaxY - dMinY) / (INDEX_MAXY - INDEX_MINY - 10)
sHori = (dMaxX - dMinX) / (INDEX_MAXX - INDEX_MINX - 10)
'以比例尺最大值为准,进行缩小
sScale = sVert
If sVert < sHori Then
sScale = sHori
End If
'计算边界缩放后的大小,便于居中
dSVert = (dMaxY - dMinY) / sScale
dSHori = (dMaxX - dMinX) / sScale
dSVMin = (INDEX_MAXY - INDEX_MINY - dSVert) / 2 + INDEX_MINY
dSHMin = (INDEX_MAXX - INDEX_MINX - dSHori) / 2 + INDEX_MINX
'将边界点转成布局里的坐标
ReDim points(3 * nBJPt - 1)
For i = 1 To nBJPt
points(3 * (i - 1)) = dSHMin + (vBJPts(2 * (i - 1)) - dMinX) / sScale
points(3 * (i - 1) + 1) = dSVMin + (vBJPts(2 * (i - 1) + 1) - dMinY) / sScale
points(3 * (i - 1) + 2) = 0
Next
' 画边界
Set plineObj = objPaperSpace.AddPolyline(points)
plineObj.Closed = True
' Define the 2D polyline points
'points1(0) = dxmin: points1(1) = dymin: points1(2) = 0
'points1(3) = dxmax: points1(4) = dymin: points1(5) = 0
'points1(6) = dxmax: points1(7) = dymax: points1(8) = 0
'points1(9) = dxmin: points1(10) = dymax: points1(11) = 0
' Define the 2D polyline points
'画出全部分幅图图框
For i = 1 To nMaps
dxmin1 = dSHMin + (vMapPts(4 * (i - 1)) - dMinX) / sScale
dymin1 = dSVMin + (vMapPts(4 * (i - 1) + 1) - dMinY) / sScale
dxmax1 = dSHMin + (vMapPts(4 * (i - 1) + 2) - dMinX) / sScale
dymax1 = dSVMin + (vMapPts(4 * (i - 1) + 3) - dMinY) / sScale
points1(0) = dxmin1: points1(1) = dymin1: points1(2) = 0
points1(3) = dxmax1: points1(4) = dymin1: points1(5) = 0
points1(6) = dxmax1: points1(7) = dymax1: points1(8) = 0
points1(9) = dxmin1: points1(10) = dymax1: points1(11) = 0
' 画图幅的范围框
Set plineObj = objPaperSpace.AddPolyline(points1)
plineObj.Closed = True
Dim textObj As AcadText
Dim textString As String
Dim insertionPoint(0 To 2) As Double, alignmentPoint(0 To 2) As Double
Dim height As Double
' Define the text object
textString = CStr(i)
insertionPoint(0) = (dxmin1 + dxmax1) / 2
insertionPoint(1) = (dymin1 + dymax1) / 2
insertionPoint(2) = 0
alignmentPoint(0) = (dxmin1 + dxmax1) / 2
alignmentPoint(1) = (dymin1 + dymax1) / 2
alignmentPoint(2) = 0
height = 2#
' Create the text object in model space
Set textObj = objPaperSpace.AddText(textString, insertionPoint, height)
textObj.Alignment = acAlignmentMiddleCenter
textObj.TextAlignmentPoint = alignmentPoint
'当前图幅绿色线性填充
If i = nMap Then
Dim hatchObj As AcadHatch
Dim patternName As String
Dim PatternType As Long
Dim bAssociativity As Boolean
' 定义填充图案
patternName = "ANSI31" '斜线填充
PatternType = acHatchPatternTypePreDefined '使用预定义
bAssociativity = True '关联
' 在模型空间中创建关联的 Hatch 对象
Set hatchObj = objPaperSpace.AddHatch(PatternType, patternName, bAssociativity)
Dim col1 As AcadAcCmColor
Set col1 = AcadApplication.GetInterfaceObject("AutoCAD.AcCmColor.17")
Call col1.SetRGB(0, 255, 0)
hatchObj.TrueColor = col1
' 附着外边界到填充图案对象,并显示该填充图案
' 定义填充边界
Dim outerLoop(0) As AcadEntity
Set outerLoop(0) = plineObj
'outerLoop = vtObj(outerLoop)
hatchObj.AppendOuterLoop (outerLoop)
hatchObj.Evaluate
ThisDrawing.Regen True
End If
Next
End Function
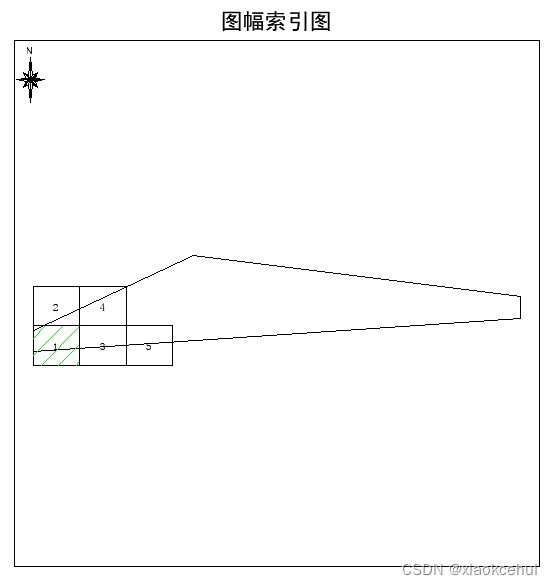
有需要的同学可以参考一下,主要的功能就是,首先将真实的边界和图幅坐标转成分幅索引图中的布局坐标,然后在分幅索引图中进行绘制,最后将当前图幅填充成绿色斜线,效果如下: